

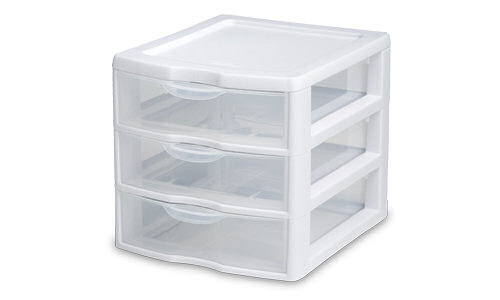
College graduation brought on a very busy Summer, which led to very little time at home, which led to quite a long over due to-do list. On my ridiculously long list of things to get done before Summer ends, one was my guest room. Because we live in a 2 bedroom town home and it's only my boyfriend and I, we are lucky enough to have a spare bedroom with plenty of room to host guests that come visit us for the weekend (or sometimes much longer than that). In our spare bedroom we have a bed, a book case, a closet full of my clothes, and my dressing table. I have so many hair and makeup products that I decided earlier this year to stop hostilely taking over our bathroom and move all my dressing bits and bobs to the spare room that doesn't get much use (especially now that I'm out of school and homework free, SO WEIRD I KNOW) . I'm still looking to keep the room presentable for guests while keeping all of my products out of sight as much as possible. I've been using these clear drawers for everything since I was a fresh-faced 18 year old that moved out and couldn't afford real furniture.
Yes my mattress and box spring still sit directly on the floor in both rooms. Judge me...
Anyways, I've been looking to find a way to hid the mess inside the clear bins and stumbled across the greatest piece of crafting tool ever while puroosing the clearance aisle in Target. So basically if you're looking for a cheap and (semi)simple way to style your eye-soars, here you go! It has made my dressing area so much cleaner to the eye and makes my time spent getting ready (somewhat) more exciting!
Materials you will need:
- Scissors
- Measuring Roll, the flexible kind
- Scotch Tape
- Box Cutter
- Adhesive Drawer Liner from Target. They have a variety of patterns for different prices. I got mine in the clearance/$1 section for $3 :)
- Drawers, like mine from the company Sterilite which I think can be found at most Target stores
You will see that on the bottom side of the liner that there is a grid, which is super helpful for cutting straight lines! I basically just measured out the front of each drawer's face. It's important to use a flexible measuring roll so that you can get the curve of the drawer's face. I gave about an inch extra on each side so as to make sure the liner would wrap all the way around.

When I finally cut the liner and stuck it on the front, I used scotch tape to make sure to the edges stayed down and didn't get peeled off as I opened and closed the drawers. I then used the box cutter to cut slits in the liner right where the drawer handles were and tucked the liner around the handle, using tape to make sure the liner stayed in place around the edges of the handle as well.


I had extra liner so I then measured out the indent on the top of the drawers to add a little more. I think the top piece really pulls it all together!

One more step I thought would be cute is to get stickers and put words on the front of each drawer. I would love to have black letters in beautiful font that said, "live" "laugh" "love" or something like that!
Next step is the bed, bookcase, walls, and closet! Wish me luck <3
xoxo
No comments:
Post a Comment