Showing posts with label DIY. Show all posts

Wednesday, August 12, 2015

Simple & Cheap Way to Style Your Furniture! {DIY}


College graduation brought on a very busy Summer, which led to very little time at home, which led to quite a long over due to-do list. On my ridiculously long list of things to get done before Summer ends, one was my guest room. Because we live in a 2 bedroom town home and it's only my boyfriend and I, we are lucky enough to have a spare bedroom with plenty of room to host guests that come visit us for the weekend (or sometimes much longer than that). In our spare bedroom we have a bed, a book case, a closet full of my clothes, and my dressing table. I have so many hair and makeup products that I decided earlier this year to stop hostilely taking over our bathroom and move all my dressing bits and bobs to the spare room that doesn't get much use (especially now that I'm out of school and homework free, SO WEIRD I KNOW) . I'm still looking to keep the room presentable for guests while keeping all of my products out of sight as much as possible. I've been using these clear drawers for everything since I was a fresh-faced 18 year old that moved out and couldn't afford real furniture. 
Yes my mattress and box spring still sit directly on the floor in both rooms. Judge me...
Anyways, I've been looking to find a way to hid the mess inside the clear bins and stumbled across the greatest piece of crafting tool ever while puroosing the clearance aisle in Target. So basically if you're looking for a cheap and (semi)simple way to style your eye-soars, here you go! It has made my dressing area so much cleaner to the eye and makes my time spent getting ready (somewhat) more exciting!

Materials you will need:
  • Scissors
  • Measuring Roll, the flexible kind
  • Scotch Tape
  • Box Cutter
  • Adhesive Drawer Liner from Target. They have a variety of patterns for different prices. I got mine in the clearance/$1 section for $3 :)
  • Drawers, like mine from the company Sterilite which I think can be found at most Target stores
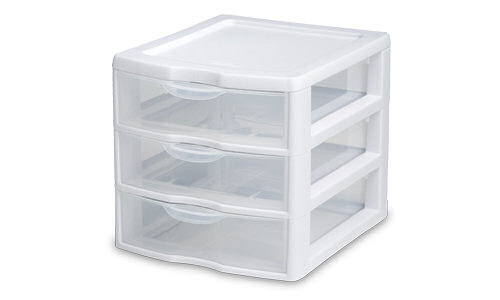
2073 - Small 3 Drawer Unit 
You will see that on the bottom side of the liner that there is a grid, which is super helpful for cutting straight lines! I basically just measured out the front of each drawer's face. It's important to use a flexible measuring roll so that you can get the curve of the drawer's face. I gave about an inch extra on each side so as to make sure the liner would wrap all the way around.


When I finally cut the liner and stuck it on the front, I used scotch tape to make sure to the edges stayed down and didn't get peeled off as I opened and closed the drawers.  I then used the box cutter to cut slits in the liner right where the drawer handles were and tucked the liner around the handle, using tape to make sure the liner stayed in place around the edges of the handle as well. 


I had extra liner so I then measured out the indent on the top of the drawers to add a little more. I think the top piece really pulls it all together!


One more step I thought would be cute is to get stickers and put words on the front of each drawer. I would love to have black letters in beautiful font that said, "live" "laugh" "love" or something like that! 
Next step is the bed, bookcase, walls, and closet! Wish me luck <3
 xoxo

Tuesday, July 8, 2014

Kitchen DIY


Today I did some DIY kitchen decor/accessories/whatever you want to call them for under $10. I was sick of looking in my pantry and seeing bags of baking stuff thrown every which way. I think these jars are a great way to keep things fresh, organized, and open so that you won't forget you have them, which is probably my biggest problem of all! I buy something and forget I have it because it gets lost in the back of my cupboards. Does this happen to anyone else?


I went to Michael's craft store for all my items. I got the enormous mason jars for just $3 each and the little mason jars were on sale as 2/$3.


There's a variety of different chalkboard labels now available at craft stores. I chose these because I knew I could cut them however I wanted. These are nice because they are stickers so they were very easy to apply onto the jars.


One thing I am going to find once I go back to the craft store is a chalk pen. I guess I'd forgotten how difficult it was to write neatly with a thick piece of chalk. I'll be able to make the labels look much better with the proper chalk.


I used my little jar for brown sugar just because I don't use brown sugar that often. You can see the little jar that is holding my straws is a cute little milk jar. I love it! It was part of the 2/$3 deal so instead of getting two pint mason jars I mixed it with one pint mason and this cutesy little dairy jar. I want to get some prettier Summer designed straws to put in it, but the hearts will do for now. 
Now I realize I need more jars for my almonds, rice, granola, powdered sugar, chocolate chips, & just about everything and anything else I can think of :)

Thanks for having a look!


Tuesday, July 1, 2014

Home Made Baby Shower Decorations


As I was up in Washington this weekend celebrating my baby nephews first birthday, I was reminiscing on his baby shower last year. It was the first time I ever threw a baby shower (or any kind of party for someone) and I'm quite proud of the work I did. I am not exceptionally creative by any means, but I thoroughly enjoyed creating a vision for this party to celebrate the birth of my first nephew and executing this vision was very satisfying (and stressful). Obviously I had no intention of posting these pictures anywhere, which is why they are such poor quality, but I hope you can at least see a little of what I put together for my lovely sister :)
Below is the cupcake stand I created! The party was Noah's Ark themed so I tried to go with the animal aspect of this theme. This ended up being such a great centerpiece to the party and added so much to the overall look and decor. Not many parties have such an extravagant cupcake shrine towering over them!

 I had brought some cardboard boxes home from work and none of them were the correct sizes. I literally had to cut them into pieces and tape them back together to create the correct sizes. Then I wrapped them with wrapping paper as neatly as I could and used some streamer around the side to add some cute detailing. I purchased little animals from the dollar store to add to the decoration and detailing as well. Everyone loved the stand and actually thought it was a big cake until they got to look closer. I'm so happy with how it turned out and it actually ended up being the cheapest decoration piece! For the cupcakes I just made regular box cupcakes and frosted them blue, but added cute little animal pictures to the top that I purchased from Hobby Lobby.


My sister also graduated with her PsyD this same week, which is why the banner reads "Dr. Mom" :)


Below is the diaper quad I created! I had created a diaper cake for my best friends baby shower before, but I decided to do something a little different and more challenging this time. My sister and her husband love riding quads so I decided to try a diaper quad! I wish I had more pictures of the process I went through to create this because it sure was something! 


Basically, and I mean this is the very basic idea of this, the wheels of the quad are made with newborn diapers. The swaddle blankets (I think that's what they're called?) are used as the axles and keep the diapers in shape as well as some meticulously placed rubber bands and some cute ribbon to cover the ugly parts :) The seat is a basket full of extra blankets and bottles and cute little gifts. I used more blankets to create the seat and handlebars. Ribbons basically held everything together. Little socks were used as the handlebar grips and a bib added some cute detail to the seat.


The last homemade decoration was my tissue balls! These were honestly the most annoying and time consuming decoration of all. There's tons of tutorials for them on YouTube and other blogs. While they were frustrating to make, they were so important to the overall appearance of the party. I'm so glad I made them and I would do them all over again too. Sorry the picture is so crap, but just believe me when I say that they are magical and pull the whole thing together.

I absolutely love home made decorations. I was so proud of the party I threw. The guests played unique baby shower games and really enjoyed themselves. I feel as though I've been to so many parties with the same dollar store/Party City decor and they all feel the same if I'm being honest. I had people asking where I got my decorations and party games from and I was so thrilled with the sincere compliments on my weeks worth of hard work!  Of course I utilized some cheesy baby decorations from Hobby Lobby and Party City to add to the fun, but instead of paying $10 for 3 tissue balls, I made about 20 tissue balls for under $5! So worth it! 

I found all my inspiration for these crafty decorations on Pinterest and then utilized some YouTube tutorials to create! Feel free to follow my on Pinterest to find other things that inspire me :)

If you have made it this far, I truly appreciate your time in reading this <3

Here is a cute little picture of myself and my baby nephew whom all of this hard work and celebrating was for:


Cheers!